Showing posts with label Tim Holtz Distress Ink. Show all posts

Friday, July 01, 2016

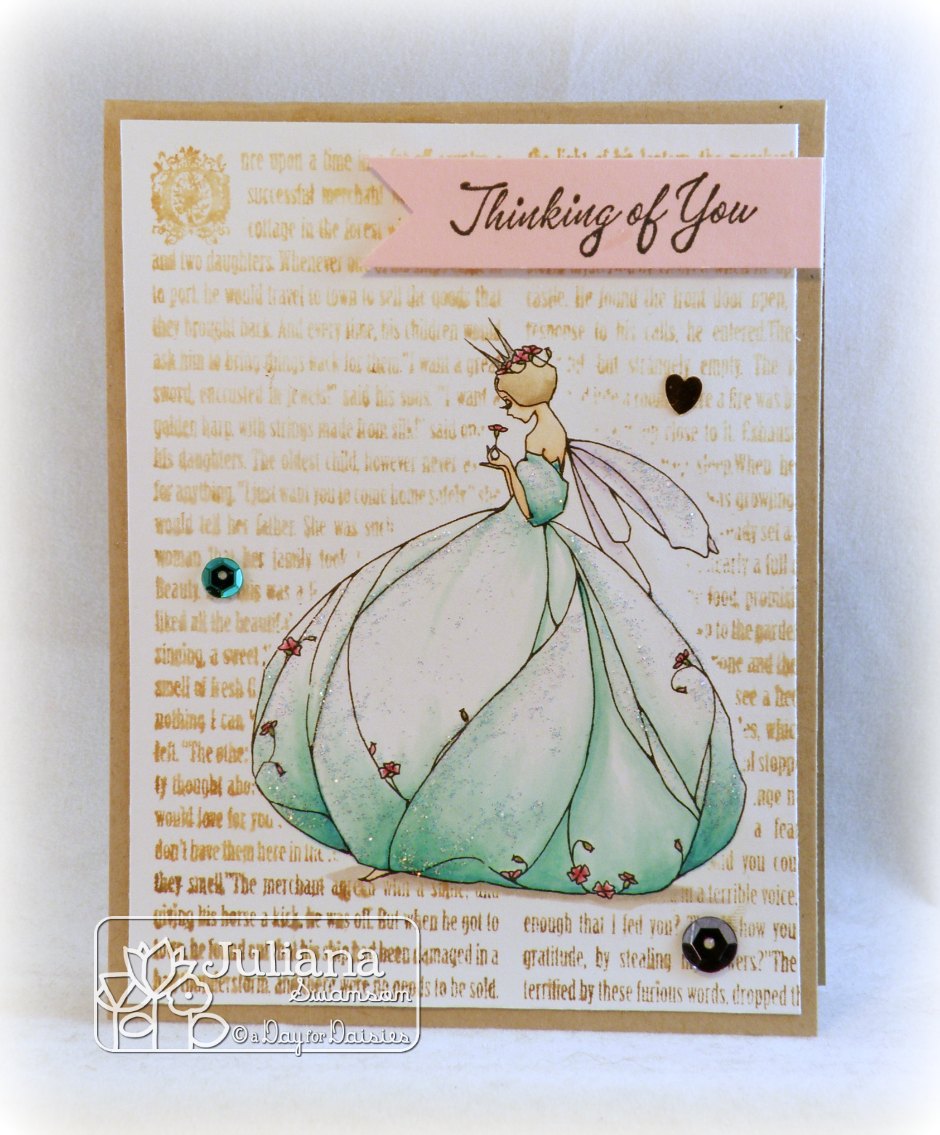
Fairy Queen Thinking

Happy Friday!
Today I get to show you one of the latest releases from A Day for Daisies!
Her name is Fairy Queen Violet:
She is colored with Copic markers; and then I masked the image and stamped a background stamp from Rubbernecker (Sleeping Beauty) over it.

The background image was inked in an ombre style using Tim Holtz distress inks: Antique Linen, Frayed Burlap, Brushed Corduroy, and Walnut Stain.

There are more wonderful "ombre" creations using this NEW release on the blogs of my teammates:

I hope you can join us for our Ombre Challenge on the A Day for Daisies Blog!

Friday, November 27, 2015

Native Doll

I hope my friends in the United States had a wonderful Thanksgiving!!

I have another card from the Native Dreams collection at A Day for Daisies.  
She is called "Baby Doll Dreams":

She is colored with Copic markers.  

I pierced the edge using plastic canvas to space the holes. Then I used embroidery floss to (2/6 strands) to make a cross stitch patten on the edge of the image layer.

To age the piece (and bring birch bark to mind) I sponged the edges with Tim Holtz Distress Ink (Pumice Stone and Antique Linen).

There are more beautiful creations on the blogs of my teammates:


Alison
Arielle
Broni
Cathy
Cindy
Jen
Juliana
Kathy
Tanja
~
Have you joined us for our watercolor challenge, yet!?!  There is still time!
All the details are on the blog HERE!

Looking for a holiday shopping deal??  Check this out:
To take advantage of this deal just shop at the A Day for Daisies Store!

Enjoy your Friday!

Friday, July 03, 2015

It's about the shoes

Happy Holiday Friday, to my friends in the U.S!

The July Kit for A Day for Daisies is a beautiful and clever images featuring mermaids and their longing for beautiful shoes!!!

Today I have used "Mermaid She Dreams":
This card is shimmery in real life due to the addition of Perfect Pearls (By Ranger)

  • She is colored with Copic markers then masked it.  
  • I inked "abstract roses" with peacock feathers (Tim Holtz), Cool Caribbean (SU!) and sea glass (Tim Holtz).
  • I stamped off the stamp on a scrap piece of paper
  • Then I misted the stamp with water
  • I stamped over the masked image with the stamp
  • Prior to removing the mask, I misted the image with an ink, water, and Perfect Pearls
  • After removing the mask, I wanted more shimmer so I added more droplets (water with Perfect Pearls)

There are more mermaids with "sparkle":
Arielle
Broni
Juliana
Thanks for dropping by my blog to day!  I hope to see you on the "A Day for Daisies" Blog for the "Add Sparkle" challenge!

Saturday, October 18, 2014

A Simple Thanks a Latte

I am heading out to the Stamp Scrap Art Tour, today.

I will be demonstrating watercolor floral stamps today at the Rubbernecker booth.
Rubbernecker Stamps

It is a beautiful crisp fall day... perfect for day for a latte!

Thanks for stopping by!

Friday, September 05, 2014

Watercolor Blossom

We made it!  It is Friday!!

This has been a marathon week at our house... I am not sure how a short week ended up so loooong, but it did!

Friday is here and that means it is time for an A Day for Daisies card!!
Today I watercolored the image, Flower #1 (a digi from A Day for Daisies):

As inspiration I used the colors from ColourQ #257:
(note: the lighter blue backgroud is really more "bermuda bay-ish" 
in real life but, my camera just doesn't like that color)

This blossom is a part of the September Club at A Day for Daisies.  This week we (the design team) are playing just with the flowers!
There are some delightful cards on the design team's blogs:

Arielle
Broni
Danielle
Juliana
Mila
~
There is a new challenge on the A Day for Daisies Blog!  Painting!  We are looking forward to see what you create!!

Thanks for stopping by my blog!  I hope you have a wonderful and creative weekend!


Materials List: Flower #1 (a digi from A Day for Daisies); Tim Holtz Distress ink; watercolor paper, patterned paper from Pebbles Inc and Cosmo Cricket; cardstock; Perfect Pearls; "thank you" stamp;

Friday, August 22, 2014

Veggie Love!

Friday is here!Which means I have an A Day for Daisies card for you.  Actually, today, I have TWO!
This first one uses Fancy Carrots:

AND the same thing; only different...My second card uses Fancy Onions:


The cards were created using an inspiration board for our new challenge on the A Day for Daisies Blog:


For more veggie creations you want to visit the blogs of my fellow design team members:

Arielle
Broni
Danielle
Juliana
Mila
~
So another challenge is ON!  Come and play along!!   All you need to know is on the  A Day for Daisies Blog!!!

Did you know about the A Day for Daisies Club??  It is a great deal! ;)

Thank you for stopping by my blog today!  I hope your weekend is full of fun (and some crafting)!


Details:
Images: Fancy Carrots/Fancy Onions from A Day for Daisies;
Coloring Medium: Copic markers;
Paper: Bristol paper and Bazzill cardstock;
Accessories: Template, Tim Holtz Distress Ink; sponges; foam tape; twine;

Thursday, August 07, 2014

Watercolor and DTGD

At SplitcoastStampers this week, there is the "Dare to Get Dirty" Challenges.  The SplitcoastStampers design team (Dirty Dozen) hosts a series of challenges for fan club members.

Both of my cards use the Rubbernececker Stamps: Floral Watercolors stamps.

My first card is for CassieT's challenge:
Card Details:

  • Stamps: Rubbernecker Stamps: No mind has imagined and Blossom;
  • Papers:white and Bazzill cardstock in light pink and green;
  • Ink: Tim Holtz Distress Inks;
  • Accessories: Spellbinders die, foam tape Stickles;


This second card is for "HousesBuiltofCards"'s challenge:
Card Details:

  • Stamps: Rubbenecker Stamps: "Faith" and "Flowers in the Breeze";
  • Paper: White, and blues from Bazzill;
  • Ink: VersaMark and Tim Holtz Distress Ink;
  • Accessories: gold embossing powder, Spellbinders die, foam tape;


I hope to play more, but other parts of my life is getting in the way.

Thanks for stopping by my blog, today

Friday, August 01, 2014

Finally, brethren...

Yes!  Another Rubbernecker card as I am getting excited for the stamp show in Novi.

This verse has been a theme verse for me:
Stamps:


Thanks so much for stopping by!

Tuesday, July 29, 2014

You will go out with joy!

I have yet another Rubbernecker Stamps card for you today:
Stamps:


I am looking forward to demonstrating this technique at the Rubbernecker booth in Novi, MI August 3rd and 4th! (Heirloom Productions)

Perhaps I will see you there!

Sunday, July 27, 2014

Faith in things unseen

I have a Rubbernecker Stamps card to share with you today:


Stamps:


I will be demonstrating this technique at the stamp show in Novi, MI (Aug 2nd & 3rd)!
I hope you come by and say "Hi!"

Friday, July 25, 2014

Hello Ladybug!

Happy Friday!!
A Day for Daisies is featuring some adorable ladybug images this week!

I had such fun with "Ladybug Hello":
This little girl and her two winged friends are colored with Copic markers.  

I printed out the image another time on plain copy paper (I also changed the print color to a light grey) to create a mask.   I placed the mask on the main image and taped the edges so I could sponge and spritz with Tumbled Glass Distress Ink and home made pearly spray.

Please take the time to check out what the rest of the design team has created:


Arielle
Broni
Danielle
Juliana
Mila
~
We also have a new challenge at the A Day for Daisies Blog!!
Challenge #101 is to use torn edges!  I can't wait to see what you create, so PLEASE join us!

Happy Friday!

Card Details
Image: "Ladybug Hello" from A Day for Daisies;
Coloring Mediums: Copic markers; Tim Holtz Distress Ink;
Paper: Bristol Paper, Core'dinations cardstock;
Accessories: Perfect Pearls (pearl); mister; lace, button, twine;

Wednesday, July 16, 2014

And now these three remain..

And now these three remain:   
Faith, Hope, and Love.   
But the greatest of these if Love. 
1 Corinthians 13:13

This sentiment is available from Rubbernecker: Faith Hope and Love (736-05)
The layout for this card is from Retro Sketches #123:
Isn't this a GREAT Sketch!?!

I used some other Rubbernecker stamps, too!


Thanks for stopping by today!!

If you are going to the Heirloom Productions Stamp Show in Novi, MI on August 2 & 3, please stop by the Rubbernecker booth and say "HI!"

Wednesday, June 04, 2014

Trust in Him

Trust in Him at all times,
Pour out your heart before Him;
God is a refuge for us.
~Psalm 62:8

I am playing with the Rubbernecker watercolor floral stamps again.

This time I have used Fall Tree:
I inked the stamp with Shabby Shutters Distress Ink pad and then with a fine paint brush and re-inker ink I added the details with Gathered Twigs, Crushed Olive and Peeled Paint. The image was misted then stamped onto watercolor paper.

The sentiment (Trust in Him) was stamped with Dark Brown Fluid Chalk Ink.

The background stamp (Brushed Hearts) was inked randomly with all the colors of the tree, misted thoroughly and then stamped onto watercolor paper.

Thanks for stopping by my blog today!!

Thursday, March 20, 2014

Hope in the Lord!

Happy Spring!
Here in Michigan it actually looks a lot like spring.  I have lived in Michigan too many years to be fooled into thinking it will stay like this... but for today, it is spring-ish!

The spring weather inspired this spring card:

The rest of the inspiration came from the ColourQ challenge (#233):

The background stamp (Mums 694) was inked with Tim Holtz Distress ink, then misted with water before stamping.  The background has a little bit of mottling and puddling of the ink... a look that works well with this image.

The squares are portions of the background stamp that I colored with Copic markers.
Thankfully, spring can happen at ANY time in my studio!

Thank you for stopping by my blog!
Happy Spring!


Details:


Monday, March 17, 2014

Happy St. Patrick's Day!

St. Patrick's Day is today!  Irish or not, it is a fun day!


I have a "lucky" card to share with you today!
This little "Monkey Irish" is ready to play, get kissed, or pinched... what ever he can get for his pot of gold.

The pot of gold is accented with a gold glitter gel pen and then Glossy Accents are dabbed on top.

The background (victorian flower panel) was inked with distress markers.  After I stamped it, I dotted some Stickles for extra fun.

May the Luck O' the Irish be with you today!!
~Juliana O'Swanson


Card Details:
Image: Monkey Irish from Hambo;
Background Stamp: victorian flower panel from Rubbernecker
Ink:Tim Holtz Distress Ink: Spun Sugar, Worn Lipstick, Dried Marigold, Squeezed Lemonade, Shabby Shutters, Peacock Feathers, Shaded Lilac, Seeded Preserves;
Coloring Medium: Copic Markers;
Accessories: foam tape, Stickles, Glossy Accents;


Saturday, March 08, 2014

Watercolor Love

I have two cards for you using the "2 Daisies" stamp.
I inked the flower with Tim Holtz Distress Ink Markers, misted then stamp...

Then stamped once on this card:

Then I misted it lightly again and stamped  a second time on this card:
Whenever I use the Rubbernecker Watercolor Florals, I try to have a second stamping surface ready.

Thank you for stopping by today!


Materials:
"Love is All You Need" card:

  • Stamps: Beauty and the Beast, 2 Daisies, All You Need; all from Rubbernecker Stamps;
  • Paper: cardstock from Bazzill; designer paper;
  • Ink: Tim Holtz Distress Ink: Peacock Feathers, Sea Glass, Shabby Shutters, Antique Linen, Vintage Photo; Colorbox Fluid Chalk Ink: Chestnut Roan;
  • Accessories:  heart and lace punches; Spellbinders die; sequins, pearls, button, twine, foam tape; 

"Proverbs 31:25" card:

  • Stamps: 2 Daisies and She Is Clothed; both from Rubbernecker Stamps:
  • Cardstock: Bazzill Cardstock; DCWV Embossed Card;
  • Ink: Tim Holtz Distress Ink: Peacock Feathers, Sea Glass, Shabby Shutters; Memento: Tuxedo Black;
  • Accessories: Spellbinders die; stick on jewels; foam tape;


Monday, February 17, 2014

May Your Wishes Come True

Today I got to play with on of the multi-step watercolor stamps from Rubbernecker!

This card uses: Watercolor Wish.
For me, it works best to stamp the stems, first, then the large blossom stamp, and finally the small (inner) blossom stamp.
For this card, I applied the Stickles (glitter glue) by putting a small dab on the flower centers stamp and stamping on the flowers.  It worked very well.

It is so easy to get these beautiful blossoms!

Thank you so much for stopping by my blog, today!!


Card Details:
Stamps: set: Watercolor Wishbackgrounds: Best of Times and Horizontal Chevron; ALL from Rubbernecker Stamps;
Paper: Stampin' Up!: Very Vanilla; Bazzill: cardstock;
Ink: Tim Holtz Distress Ink: Worn Lipstick, Spun Sugar, Peeled Paint, Shabby Shutters; Colorbox Fluid Chalk ink: Chestnut Roan;
Accessories: lace, Spellbinders dies, foam tape, Stickles;