Monday, November 27, 2006

One Last Fall Card


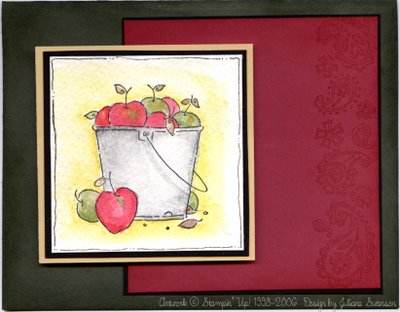
Here is one last fall card for the year. I love watercoloring with this set and I wanted to use it one last time before it goes up high on the shelf. I chose rich colors highlighted with black to express the coziness I feel coming into hot cider on a crisp fall day.

--The stamp sets I used are "Give Thanks" and "Double-Line Doodles". ("Double-Line Doodles" will not be available until July 2007)
--The papers are: Watercolor Paper, Basic Black, So Saffron, Always Artichoke, and Rose Red. I stamped the apple bucket image with StazOn Black and I watercolored the image with Rose Red, Close to Cocoa, Garden Green, and So Safron.
--The bucket was colored with a grey watercolor crayon and painted with an AquaPainter.
--I did some doodling around the image with a Stampin' Write Journaler (the fine point end). --The Rose Red square was stamped and sponged with Rose Red ink (I love this look--one of the many wonderful aspects of coordinated inks and papers).
--The Always Artichoke base card is also sponged with Always Artichoke craft ink. The main image is adhered with Stampin' Dimensionals to "pop" it off the card.

Thanks for stopping by! Feel free to leave a comment!
Thursday, November 09, 2006

More with Watercolor Wonder Crayons

This is another project from my Oscoda class.

Stamp Sets: Petal Prints and Flora Background
Inks: Creamy Caramel and Chocolate Chip classic
Paper: Very Vanilla, Close to Cocoa, and Creamy Caramel
Accessories: Double hole punch, White narow organdy ribbon, caramel gingham ribbon and brayer, misting bottle.

This card uses the crayons directly onto the rubber. I colored directly on the rubber after misting it lightly with water, then mist again prior to stamping. I particularly like this technique with this stamp because the result looks more like a pressed flower. I used the Coluzzle oval template to make the oval. The oval is also sponged with Creamy Caramel Classic ink. The background is Chocolate Chip Ink brayered onto the stamp (wood down--rubber up) and stamped onto Close to Cocoa cardstock. I am much happier with the results of brayering ink onto the Floral Background stamp rather than inking it directly with the pad. It takes an extra minute to clean up--but well worth the extra effort.

Thank you for taking the time to look!!


Tuesday, October 31, 2006

Happy Halloween!


I just wanted to make a quick post to show a project that my Oscoda class did last week.

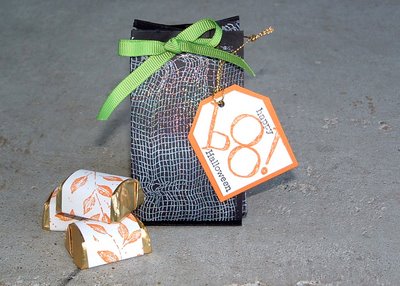
This is a 2-4-6-8 box. It is a 5.5" x 8.5" piece of cardstock, scored lengthwise 2" from one side and scored widthwise at 2", 4", 6", & 8". The flaps on the short side of the lengthwise score are cut on the scorelines to the intersecting score line.

This box was stamped with white craft ink and the "Cheesecloth Background" stamp, then embossed with "Iridescent Ice" embossing powder. The tag was stamped with "Whimsical Alphabet-Lower" and "Everyday Flexible Phrases" in Pumpkin Pie and Black, and punched with the tag punch.

The candy is Hershey's Nuggets. We used the "Leaf Print" wheel to stamp Avery return address labels with Pumpkin Pie ink. The labels fit the chocolates PERFECTLY!

I am not super into Halloween, so it was fun to creat a project without using any Halloween stamp sets.

I hope you enjoyed my treat!

Tuesday, October 17, 2006

What could be better?!?

I had a wonderful stamping weekend!

First I set up my table for the church bazaar on Thursday (yes, I know that is technically NOT the weekend, but cut me some slack here). Then I headed to my mother-in-law's home because she was going to take care of my youngest daughter. There I finished stamping my swaps. Swaps are projects that you "swap" with other crafters, in this case it was stamped card fronts. I needed swaps since I was heading to Lansing (MI) for the Stampin' Up! Regional Seminar!

Here is my swap:
Friday, before the crack of dawn, I headed to Lansing. The weather was not too wonderful, but not terrible either. I really did not care as long as it did not keep me from getting to the Lansing Center to hang out with 500 other Stampin' Up! stampers! I joined my upline (and good friend), Virginia, at a restraunt and moments later we arrived chilled but giddy at the seminar. We arrived a little too late to do much swapping, but in plenty of time to find a good seat and socialize a bit. We sat at a table with two other folks from splitcoast: Kendra and MichelleY. They were very sweet and had some good ideas for my business. Also at our table was Kendra's sister from Lansing.

The presenters and Shelli were interesting and inspiring. I had a great time and I learned a lot. Not just about being a Stampin' Up! demonstrator, but also about stamping!!

All, too soon, the day came to an end. I was able to have a nice long supper with Virginia, before hitting the road with half of Michigan to head north on I-75.


Saturday, my daughter Gracie and I headed to church to "man" my craft sale table. She showed me what she, her brother, and her daddy had sold the evening before (in my absence). They had done well. Saturday passed quickly. I met many sweet people and sold a few things. Best of all, I got to hang out with my Gracie.

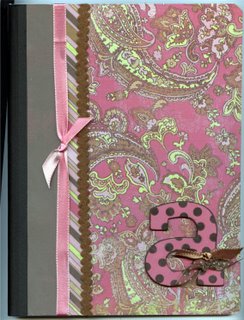
At the next table the rep. from Home Interiors and Gifts, Denise Mochty, ordered a composition book for her daughter's baby shower. Here it is:It was a great weekend. I met so many great people, sold a few things, caught up with a good friend--all because of stamping!

Friday, October 06, 2006

Free Standing Pop Up Card

I am trying to get things ready for the Church Bazaar on October 13th and 14th. I am renting a table in an effort to sell my creations.

Today I tried a "free standing pop-up card". I would love to take credit for designing this project, but alas, I cannot. It was designed by Joelyn at Splitcoast Stampers. She has designed a great project sheet and directions: HERE There is a link to one of her cards on the thread, too. If you do decide to take advantage of her directions and diagrams, please let her know how helpful they were!!
I used some trial and error to make the project work for me. Unless, otherwise noted, all products are from Stampin' Up! I have used the "Pretty Princess" stamp set from Stampin' Up! The cake is stamped with Jet Black StazOn (solvent/waterproof ink) on watercolor paper. I watercolored with dye ink and a water filled pen (aqua painter). The inks colors were Certainly Celery, Bashful Blue, Lavender Lace, Pretty in Pink, Regal Rose, and So Saffron. Using a glue pen I highlighted some of the icing on the cake and the candle flame and then used Dazzling Diamonds glitter. (very fun!!) For the card base I used Lavender Lace cardstock and stamped the flower from the set with Lavender Lace ink--then the flowers are hightlighted with a white gel pen. I made the base a 1/4 of an inch narrower than Jocelyn's instructions in order to fit into my envelopes. The greeting on the front is from the "Its Your Birthday" set and most of the ribbon is from Wal-mart.

Thanks for stopping by my blog--If you are in Tawas MI on October 14th, stop in the United Methodist church and say "Hi!"